Wednesday, June 22, 2016

How to Configure File Explorer to Open with ThisPC or My Computer in Windows 10

Well windows 10 is a new development introduced by the Microsoft team as a result of their technological development with latest features which is very great and nice with far differences and improvement in features and lots more with the other windows versions like WVista,Wxp, W7,W8,and W8.1, but still many users of this windows are suffering with one problem or the other in configuring the OS features.

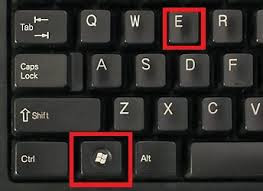
as  you know in Windows 7 and Windows 8, File Explorer(Windows logo+E) opens by default to the ‘Computer’ or ‘This PC(windows8 or 8.1), which is actually giving users an overview of their home folders, local drives, and network locations, But in windows 10  File Explorer (windows log+E) now opens ‘Quick Access’ by default which is showing users their frequently accessed folders or files and application. But This view is still available in Windows 10 the problem is how to configure it.


We are highly engaged in providing you with  tips on windows 10 so as to make thinks easy and enjoy the the world of computers
You can also Read:
Download Windows 10 Build 14366 iso Images
Microsoft Rolls Out Windows 10 Build 14361 For Fast Ring Insiders

How to Set File Explorer to Open with This PC or My Compuuter in Windows 10

But still windows users like Me, love  this type of interface as it makes it easy to quickly find the most recently accessed files and folders, as well as related data. 

So lets vividly looks at the possible way out on How to Configure Windows 10 File Explorer to Open with This PC View or my computer

Step 1: Press windows logo key+E on your computer, it will open a new File Explorer window.
How to Set Windows 10 File Explorer to Open with This PC or My Compuuter

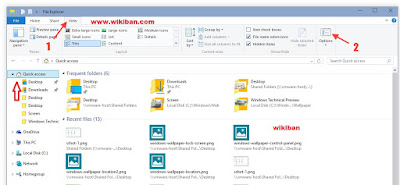
Step 2: click the View tab from the ribbon toolbar,In the View tab, find and click on Options, listed by default on the far right side of the ribbon as shown below;

How to Set Windows 10 File Explorer to Open with This PC or My Compuuter


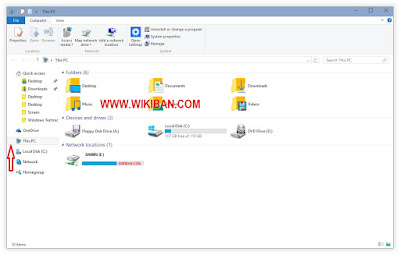
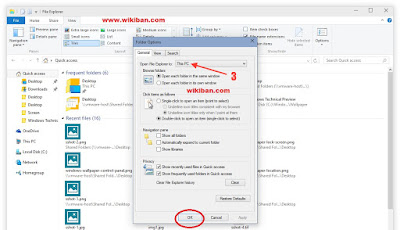
Step 3: In the Folder Options window, make sure you’re on the General tab and then find the drop-down box labeled Open File Explorer To. Click the drop-down menu and select This PC. Click OK to save your changes and close the window, as shown below;
How to Set Windows 10 File Explorer to Open with This PC or My Compuuter


Final step: exit and then try to access you file explorer by any available means of accessing it you know. example Press window key + E

How to Set Windows 10 File Explorer to Open with This PC or My Compuuter

Then you are good to go.
Regards.
 
If you dont want to miss any of our latest update you can subscribe here with your email address or you can follow us on facebook to get the latest updates about tech and more.
 

Don't forget Share.
 

Thursday, June 16, 2016

Download Windows 10 Build 14366 iso Images Plus How to make iso image

For those that are waiting for windows 10 Build 14366 official iso Images to be available from microsoft am just sad to inform you that the official iso image are not available but with the help of windows 10 ESD file and decrypter tool you can make your iso file.

Windows 10 build 14366 has been released for Windows Insiders but official ISO images are not available as it is a Fast Ring build. Here is how you can get ISO images which you can use to install this build from scratch.

windows 10 build 14366


At the moment of this writing, Windows 10 build 14366 was released for Fast Ring Insiders only. There are no official ISO images available. so here is how you can build them yourself in a few minutes.

  1. First, you need to get the ESD image file of Windows 10 build 14366. The actual links are as follows (via WzorNet):


    Windows 10 build 14366 ESD files

    Pick a file which represents the desired edition and version. For example, the file for Windows 10 build 14366 PRO x64 English is  

    14366.0.160610-1700.rs1_release_CLIENTPRO_RET_x64fre_en-us_3df8f3c5edd383e6b49a600f5e9a76da85fb7e1e.esd.
  2. Now download the ESD Decrypter tool from here:
    Download the ESD Decrypter tool

  3. Extract the ESD Decrypter tool to any folder and put your ESD file in the same directory:
How to create iso image for windows 10 build 14366 step 1
    Now right click the decrypt.cmd file and run it as administrator from the context menu.
    How to create iso image for windows 10 build 14366 step 2

     Type 1 at the command prompt to build the full ISO image:
    How to create iso image for windows 10 build 14366 step 3
     Wait for a few minutes and enjoy your ISO file!

    That's it. Thanks to all people who made this ESD-> ISO conversion possible.
    credit 

    Read Also: Download windows 10 Build 14361 iso images 

    If you dont want to miss any of our latest update you can subscribe here with your email address or you can follow us on facebook to get the latest updates about tech and more.
     

    Share This

    Microsoft Rolls Out Windows 10 Build 14366 for Fast Ring Insiders

    Well am still wondering what microsoft trying to become because update keeps rolling on day by day hour after hour. Am just happy to inform you that microsoft has just released windows 10 Build 14366 for fast ring Insiders just a while after releasing windows 10 Build 14361. As you actually know the drill more feature are being improved and more bugs are also being fixed with some known issues also. This build is from the Redstone branch which identifies itself as "version 1607". Let's see which changes are included under the hood of this build.

    Download windows 10 build 14366 iso images

    Version 1607, known as "Windows 10 Anniversary Update", is expected to be released next month. This new build comes mostly with bugfixes, so you will not find many new features

    Microsoft Rolls Out Windows 10 Build 14366 for Fast Ring Insiders

    Here is what's new


    Office Online for Microsoft Edge: Use Word, Excel, PowerPoint, OneNote and Sway Online without needing Office installed. The Office Online extension is the quickest way to view, edit, create Office files in Microsoft Edge! You can also quickly access your recent files, thanks to integration with OneDrive and OneDrive for Business. Visit our extensions page at the Microsoft Edge Dev website to learn more and try it out for yourself!
    Windows Store Update: A Store update (Version 11606.1000.43.0) is rolling out today that includes some good performance improvements to prevent the Store from crashing and using up too much resources on your devices. You should see an overall improvement navigating the Store and visiting app pages.

    The list of fixes in Windows 10 build 14366


    • For you mes amis: If you have a French Windows 10 Insider Preview build installed on your PC, you should receive this build as we have fixed the issue with the French translation process that caused a lot of text to revert from French back to English.
    • Navigating to the Privacy pages in Settings app will no longer crash the Settings app and prevent you from adjusting your privacy settings.
    • We have fixed the issue causing PC and Mobile devices trying to project to a PC (via the new PC Access feature) to fail.
    • We fixed the issue where Start would not launch while an app is installing for certain languages, such as Chinese or Portuguese (Brazil).
    • We’ve updated the size of the Windows Ink Workspace icon in the notification area on the taskbar to be more consistent with the other notification area icons. In a similar drive to improve the consistency of our experience, we’ve updated the X to leave the Windows Ink Workspace which will now show a red state when you hover over it. We also fixed an issue where mouse wheel scrolling wouldn’t work to spin the ruler with certain mice, and an issue where dismissing the share pane or accepting the prompt to enter tablet mode would result in exiting the Windows Ink Workspace.
    • We have updated Cortana search results, so now when you right-click on a .docx file, you’ll see a context menu option to open that file’s location.
    • We fixed an issue resulting in the monitors in under Settings > System > Display from sometimes jumping to a different ordering after being clicked and causing scaling changes. We also fixed an issue where the slider to change display scaling might jump to an unexpected scale factor as you were moving it.
    • We fixed an issue resulting in not being able to unsnap a full screen Remote Desktop window if you had been prompted credentials while connecting.
    • We fixed an issue when the tile names could become cut off after using semantic zoom, and one where Start tiles could no longer be moved with touch.
    • In an effort to improve visibility and access to your newly installed apps, we have moved the “Recently added” section of Start to be located above the “Most used” section in the All apps list. We’ve also increased the duration of time in which apps will be listed here – now 7 days, so you can easily try them out and decide if you want to pin them to Start or the taskbar for regular use and quick access.
    • We fixed an issue where an active VPN connection could block the PC from going from idle into sleep.
    • We fixed an issue where the touch keyboard might appear on the Lock screen after pressing the Num-Lock key on the keyboard.
    • We fixed an issue that could result in Microsoft Edge using a large amount of CPU when open to a page with many animated gifs, as well as an issue resulting in certain captchas not displaying correctly.
    • From this build on your default location will now be preserved across build updates.
    • We fixed an issue resulting in nothing happening if you attempted to expand a Skype notification in Action Center. We also fixed an issue where the scrollbar would draw with no margin from the chevron and X in Action Center notifications, and one where app logos might be missing from the Action Center.
    • We fixed an issue resulting in the cursor not showing up when interacting with the system using a Wacom tablet.
    • We fixed an issue where the Settings app could open to a blank page after selecting a settings page via search results.
    • We fixed an issue where the File Explorer window might navigate back to Quick Access after deleting something from the current folder in view. We also fixed an issue where right-clicking on the desktop might result in showing a spinning curser for a long time before the context menu would show.
    • We fixed an issue resulting in existing reminders failing to display in the Cortana UI, and an error when attempting to save a new reminder.
    • We have updated the Mobile Hotspot settings page to allow name, IP address, and mac address to be selectable so it can be copied elsewhere if needed.
    • We fixed an issue where the battery flyout might not report the correct overall charging state for devices with two batteries.
    • We fixed an issue where the title bars of apps using dark theme wouldn’t be dark when the window was not in focus, for example, Groove Music or Settings app.
    • We fixed an issue resulting in you sometimes seeing a progress indicator before the background image would load on the Lock screen.

    The list of known issues


    • The Desktop App Converter Preview (Project Centennial) will fail to run on the Windows 10 Insider Preview Build 14366. If you are a developer utilizing the converter tool to convert your desktop app to UWP, we suggest skipping Build 14366 or switching to the Slow ring until we can fix this issue.
    • If you click on a file download link outside of Microsoft Edge, sometimes Edge will open a tab and close it without doing anything. The workaround is to go to the Download pane and start the download there by clicking “Save” or “Save As”.
    • Narrator does not launch when you toggle switch to “on” via Settings app > Ease of access > Narrator.
    Source: Microsoft.


    If you dont want to miss any of our latest update you can subscribe here with your email address or you can follow us on facebook to get the latest updates about tech and more.
     

    Share This

    Tuesday, June 14, 2016

    How to Get 2GB For N200 and 6GB For N500 on Airtel (works on all devices)

    Samina mina, eh eh Waka waka, eh eh Tsamina mina zangalewa This time for Airtel, we are raising our expectations come on and feed it this is your moment No hesitation Today's your day I feel it and also believe it, because its cool and nice as it last long.

    If you get down as a result of shortage or lack of Data bundle get up and do this, every day things are coming simpler as the race of computation is highly on point as you can accommodate huge MB with a little cash.
    as know any network provider is trying as much as possible to be the best in any aspect of communication in the country by introducing cheap tariff plan and also cheap data plan for browsing, if you are following the threat of this blog i recently wrote an article on how to get Affordable Internet Data Plan and Call Tariff Plan of All Nigerian Networks so also the hottest free 300MB on MTN which i am currently using to the time of this post but considering the situation i think its time to go for Airtel as a result of the cheap introduced by them, and its very nice and working good tested and confirmed by me.


    Notwithstanding let me quickly introduce to you the new Airtel  cheapest data offer FOR 2GB at N200 valid for 14days and 6GB at N500 valid for 28days which is very amazing offer no matter how they zap it, so let's go to it.

    conditions

    1. it works on 2G network only.
    2. it works on all Airtel Sim-Cards
    3. it works on all devices(Mobile and PC)

    How to get 2GB at N200 and 6GB at N500

    • Get Airtel simcard
    • Recharge it with the amount of your choice (200, 500) 
    • Then dial *482# then send/call
    • Reply with 1 for 2GB and 2 for 6GB as shown bellow
     

    Then you are good to go mind you it only works on all kind of devices that can visit the internet bu support 2G network only 
     
    If you dont want to miss any of our latest update you can subscribe here with your email address or you can follow us on facebook to get the latest updates about tech and more.
     

    Sharing is Sexy 

    Sunday, June 12, 2016

    How to Make Money Online with WINThrills Network:Up to N5,000 Weekly with N1000 bonus for sign up

    Well this is far better than google Adsense and other internet money making services as their is no approval process required so its an advantage to any website owner or any other person who is in need of making money online.
    its simple to generate money online now, as the situation of getting online money is more favorable capable of handling our needs and want simply, so its time for any one to make money online via any kind of device that can visit the internet with any kind of internet connection.

    Well as FG of Nigeria is planning to offer employment to thousand of Nigerians I also play my role as citizen of the state as an article writer i found a very useful, trusted and reliable source of making money online mind you, not only via Adsense, running a website, affiliate marketing you can get money or fund online so lets stand up and do this.


    This service is far better from Google adsense, without wasting much of our time let me introduce to you  WINThrills Network, Winthrills network is created and managed by Mandee Thrills LTD. It's a Network Advertising platform that delivers both amazing results for its advertisers and a highly profitable revenue stream for its promoters.

    Since 2010, online marketers have depended on the WINThrills Network Advertising to deliver to visitors. WINThrills centralizes the advertisers who wish to promote products or services online and the promoters who are eager to generate revenue. 

    Recently launched WINThrills Network project -Global WINThrills Network- allows qualified WINThrills Network investors to become affiliates and earn money from referring businesses that seek funding.
      
    How To MAKE MONEY From WINThrills Network

    1.Click HERE to register now and received free N1000 in your account instantly as a starting bonus.


    As yo can see in the picture above i received N1000 bones after singing up.

    click to join me.

    NOTE: you can only get N1000 bonus if you sign up via Referral, so take note of that

     SIGN UP HERE
    2. Then start promoting ads from WINThrills Network on facebook or blogs and get paid per click.

    3. You can earn Extra with the Referral Program: With A VIP membership plan, you can earn ?#1,000 additional income every time you refer a VIP member or Advertiser to WINs network.


    How to make money via this service using Your social Network
    If you promote ads on the platform, you'll need to indicate your social network pages, website or blogs in your profile.

    Adding your social network page URL to your membership is quite simple. Follow instructions below:

    1. Log in to your Facebook, LinkedIn, Twitter or Google+ account etc.


    2. Click on your profile or timeline.


    3. Copy the link showing at the top of your browser. Some social website such as LinkedIn displays this for you on your profile page.


    Your social network Profile URL is the web address of your Profile on the internet. E.g facebook.com/wikiban


    4. Paste it in your WINThrills profile.

    5. Click on the "Save" Button

    You can edit your social network pages/URL at any time in your profile.


    by that you can start earning cash online via any  social network account.


    How to withdraw you cash


    as seen in the picture above to withdraw cash you have to follow the steps bellow
    • click on member on the right hand side
    •  then click on account.
    • account setting(this is a place where you can set your account details plus you bank name for withdrawal) save and exit.
    • fund and order for withdraw that is it as shown below

     
    Note: Withdrawal request is enabled from 25th to 30th of every month. Merchant charges (1%), Tax charges (0.5%) and Internal charges (7.5%) also applies on every withdrawal request. It could take 5 work days for funds to be processed to your withdrawal account.
    Member to member funds transfer attracts 0.5% fee.


    Minimum withdrawal (₦) : 3,000
    Withdrawal fee (%) :  7.5
    Daily limit (₦) :     1,000,000

    If you dont want to miss any of our latest update you can subscribe here with your email address or you can follow us on facebook to get the latest updates about tech and more.
     

    Sharing is Sexy

    Thursday, June 9, 2016

    Download Windows 10 Build 14361 Iso Images

    Windows Ring Insiders already received the Update for windows 10 Build 14361 but the official iso Images are still not available because it is a fast ring build. Windows 10 now is the most well designed and perfect windows for microsoft because the graphics and the interface are user friendly and even the navigation process is much more suitable than the older ones.

    With Windows 10 build 14361, Microsoft has changed the encryption key for ESD files which could be used to easily create ISO images from ESD files. So unfortunately, directly converted ISO images are not available at this time.
     
    Wzor, the trusted source for Microsoft related leaks has prepared a set of "homebrew" ISO images which you can use to download and install Windows 10 build 14361. Here are the links from his collection:


    As of the time of writing this post, the following ISO images are available:
    14361.0.160603-1700.RS1_RELEASE_CLIENTENTERPRISE_VOL_X64FRE_EN-US.ISO
    14361.0.160603-1700.RS1_RELEASE_CLIENTENTERPRISE_VOL_X86FRE_EN-US.ISO
    14361.0.160603-1700.RS1_RELEASE_CLIENTPRO_OEMRET_X64FRE_EN-US.ISO
    14361.0.160603-1700.RS1_RELEASE_CLIENTPRO_OEMRET_X86FRE_RU-RU.ISO

    Note that these ISO images were probably made by installing this build of Windows 10, and re-capturing the WIM using DISM, generalized using Sysprep and then converted to ISO.

    Download the Iso Images below

    If you dont want to miss any of our latest update you can subscribe here with your email address or you can follow us on facebook to get the latest updates about tech and more.
     

    Share This

    Microsoft Rolls Out Windows 10 Build 14361 For Fast Ring Insiders

    Just of recent on April 2016 Microsoft release windows 10 Build 14342 for fast ring insiders and the offline version came later but i was happily now to inform you that microsoft has released another windows 10 Build 14361 for fast ring insiders and some great improvement was actually attach to this version.

    Windows 10 Build 14361 is the first build from redstone branch which identify itself as version 1607 and comes with an updated features like windows ink with improved performance and also a new icon for blue ray disk and network icon in the action centre.

    Download Windows 10 Build 14361 iso Images

    The selected page in Settings left pane has color and respects light or dark color modes. When the user clicks the "Home" item on the left, it will lead him to the Settings main screen and the LastPass and AdBlock extensions are nwo available for the Edge browser with an introduction of a new keyboard shortcut to open date and calendar by pressing WinLogo+Alt+d


    Some of the new features are:

    LastPass extension for Microsoft Edge: We are excited to announce that LastPass, a popular free password management extension, is now available for download. Visit our extensions page at the Microsoft Edge Dev website to learn more and try it out for yourself!
    Introducing Hyper-V Containers: You can now use Docker natively on Windows 10 with Hyper-V Containers, to build, ship and run containers utilizing the Windows Server 2016 Technical Preview 5 Nano Server container OS image. A new version of the Docker engine for Windows has also been made available that extends the support of containers while also improving the DockerFile syntax and getting started experience for users. For more details on how to get started with this check out the Windows container documentation or the Windows 10 Getting Started Guide.
    Windows Ink improvements:
    • The Windows Ink ruler is now long enough to span diagonally across the entire Surface Book display.
    • We fixed an issue with the Windows Ink pencil tool, where the line when drawing along the ruler wouldn’t be flush with the ruler as well as an issue resulting in a slight flicker visible in the colored section when opening the Pen, Pencil or Highlighter flyout.
    • We have updated the Touch Inking icon in Windows Ink Workspace to be more reminiscent of the Windows Ink Workspace icon.
    • We improved the performance of loading the Sketchpad thumbnail in the Windows Ink Workspace flyout from the taskbar.
    • Based on Insider feedback, we have made the “clear all” option more discoverable in Sketch Pad as the trash can icon in the menu bar. This was previously accessible as an option under the Erase button.
    Settings improvements: We made some improvements to the Settings app based on Insider Feedback. The navigation pane is now white in light mode or black in dark mode and we have added a small block of color (which is same as the accent color of your profile) to highlight what Settings page you are on. Clicking anywhere on the Home button at the top left takes you to the Settings homepage. And we have made some other polish improvements, including slightly increasing the size of the page name text.
    New icons: I’ve been told that Insiders love hearing about new icons. So I thought I would mention we have updated the Blu-ray icon so that it is more consistent with the other drive icons in Windows 10.
    We also changed the icon for the network Quick Action to better represent it as an entry point to the network flyout (previously, it was a generic globe icon).
    So also Bug fixes are: 

    • We fixed the issue causing keyboard navigation in Store apps like Netflix or Tweetium to not work.
    • We fixed the issue causing certain websites like YouTube to fail to render in Microsoft Edge or IE due to a recently implemented feature called TCP Fast Open.
    • We fixed an issue resulting in a strange grey bar frequently being seen on the left side of the Microsoft Edge browser window (for example, after invoking a context menu).
    • The window of active hours for when you are using your PC has been increased from 10 to 12 hours under Settings > Update & security > Windows Update and “Change active hours”.
    • We have updated the download notification in Microsoft Edge to include filename, download status, and site domain on separate lines.
    • Fixed an issue that would cause the icons to disappear from the tabs in Microsoft Edge after the DPI change corresponding with remotely connecting to the PC via Remote Desktop.
    • We fixed an issue where DNG file thumbnails were not displaying in File Explorer.
    • We polished the appearance of Start by reducing the amount of whitespace at the top of Start, and adding logic so that the scrollbars will immediately hide once your mouse is no longer hovering over that area. We also fixed an issue resulting in clipping on the bottom or side of Start’s context menus.
    • We fixed an issue where pressing the Enter key would not submit the Wi-Fi password in the network flyout from the taskbar.
    • We decreased the size of icons used in notifications from 64×64 to 48×48 – maintaining the visibility, while improving the use of space in the Action Center.
    • We have improved the reliability of Cortana’s listening after tapping the mic button and fixed an issue that resulted in focus being lost to Cortana’s search box after a typed search has been deleted via backspace.
    • We have updated Windows Defender to not show recap notifications in normal mode if no scans have been run, or in scan-only mode if no threads have been found.
    • We fixed an issue that resulted in certain apps, such as Photos, not being able to set the desktop background.
    • Going forward from Build 14361, your Task Manager settings will now be preserved across build updates.
    • We fixed an issue where Start wouldn’t dismiss after launching Sticky Notes, leading to Sticky Notes appearing behind Start.
    • We fixed an issue resulting in not being able to set your account picture in Settings using the camera option.
    • We have added a keyboard shortcut for opening the taskbar’s clock and calendar flyout – this shortcut is WIN + Alt + D.
    • We fixed an issue where Command Prompt wasn’t maximizing correctly on high DPI monitors. We also fixed an issue where Command Prompt wouldn’t refresh the windows properly when doing an upwards Ctrl + F search with a long output of text.
    • We fixed an issue where the taskbar’s volume icon was showing incorrect states for 0% and muted.
    • We fixed an issue where applying a new save location on the Storage Settings page for any one file type would result in any other pending save location changes being lost.
    And some known issues were also considered:
    • If you have a French Windows 10 Insider Preview build installed on your PC, you will not receive Build 14361. There is an issue with the French translation process in this build that would revert a lot of text that was used to be shown in French back to English. So we have chosen not to release this build to Insiders whose base build is French. If your base build is not French and you have a French Language Pack installed – you will still be able to install the new French language pack on top of this build, but this issue will also impact you.
    • Text prediction using the Japanese IME will freeze your PC. To avoid this issue and continue using the Japanese IME, we recommend turning off text prediction. You can do this by right-clicking IME mode icon “A” or “?” in systray and selecting “Properties”, clicking “Advanced”, and navigate to the “Predictive Input” tab and check off “Use predictive input system”. You can turn on prediction feature again by checking it on.
    • Navigating to the Privacy pages in Settings app will crash the Settings app and prevent you from adjusting your privacy settings. Your privacy settings already set will remain intact after updating to this build. If this is a blocker for you, you can move to the Slow ring until this bug is fixed or be sure to set your privacy settings before updating to this build.
    • If you click on a file download link, it will open a tab and close it without doing anything in Microsoft Edge. The workaround is to go to the Download pane and start the download there by clicking “Save” or “Save As”.
    • For certain languages, such as Chinese or Portuguese (Brazil), you will not be able to launch Start while an app is installing.
     Source: Microsoft Blog

    Update: microsoft release windows 10 build 14366

    If you dont want to miss any of our latest update you can subscribe here with your email address or you can follow us on facebook to get the latest updates about tech and more.
     

    Sharing is Sexy
     

    How to link Your Bank Verification Number BVN with UBA United Bank For Africa

    UBA customers can now link up there BVN data by just dialling some simple USSD code as explained below. As you are all aware now linking your BVN data is compulsory now to use your bank account because you can't be able to withdraw money or transact without BVN. So United Bank For Africa customers can now link up there BVN details easily without stressing yourself to go to there nearest branch. These makes them follow steps of GTbank and Firstbank in linking there BVN offline.

    About Bank Verification Number BVN

    The BVN is a unique number given to all bank customers in Nigeria who had their finger prints and pictures taken at bank branches around the country. Each customer’s biometric and personal data is attached to all bank accounts he or she operates whether personal or corporate. Individual customers have single BVNs no matter the number of accounts they operate in as many banks as they desire. Consequently customers are able to register for BVN in any of the banks in which they have accounts. Once they get their numbers, they are required to send them to all the banks in which they operate accounts.


    How to Link BVN to UBA Account

    Simply dial *919*6# on the phone number you open your UBA Account with and enter your BVN number when prompted. you can also visit there online platform to Link your BVN.


    If you dont want to miss any of our latest update you can subscribe here with your email address or you can follow us on facebook to get the latest updates about tech and more.
     

    Sharing is Sexy

    Simple Trick to Delete all Your Facebook Messages at Once

    So you are also part of the victims that want to clear out there Facebook inbox at once without deleting each conversation after the other, well this guide is certainly for you. Most at the times i want to delete all my outdated messages like that of 2009 and 2010 which are old enough to get rid of. Basically there is no any official way to delete all your facebook messages at once, but with the help of a little trick you can easily and simply do so. Some of the benefit of clearing out your facebook inbox to reduce your account spam messages and easily navigate through your recent messages.

    Some disadvantages of deleting your inbox messages is for reference purposes because it can be used against you or any party as part of evidence or reference when so required.

    Now lets see how you can delete all your facebook inbox messages

    Requirements

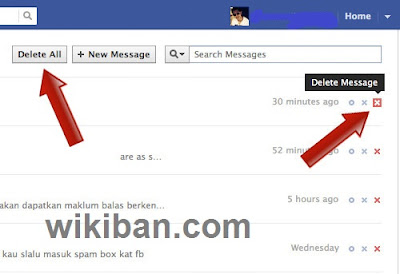
    How to delete all facebook messages at once 

    1. make sure you have google chrome browser on your Pc, if not download from the above link
    2. download this chrome extension 'Facebook - Delete All Messages' and install the extension on your chrome browser
    3. Log in to your facebook using the Chrome Browser and go to your messages
    4. Now click the extension icon at the right top corner of your browser and details on how to use it will be visible to you
    5. Finally, Click 'begin delete button' to delete all your facebook messages with a single click after confirming a pop up dialog box
    6. Now you just delete all your facebook messages with a single click easily

    how to delete facebook messagess at oncce


    You can now see that with this simple trick you can easily delete all your facebook messages at once without suffering your self to delete the conversation one after the other

    you can also read on how to enjoy facebook with airtel freely


    If you dont want to miss any of our latest update you can subscribe here with your email address or you can follow us on facebook to get the latest updates about tech and more.
     

    Sharing is Sexy

    5 Easy Ways to Get Glo Free Data Bonus

    Globacom has so far been the best telecom network which offers absolute cheap data plan by giving as far as 6GB for just N2000 and other similar cheap data services. Even though some of its subscribers are complaining that the speed in some location is actually bad because the browsing is moving like snail while in some other location the speed was superb. In this post i will like to highlight some logical ways in which you will get a free data bonus from Glo legally by not tweaking or doing some trick.

    This five (5) different steps to help you get free data from Glo is different and unique because as soon as you apply any among the many, then you can enjoy free data from Glo.

    1. Migrate to Glo Bounce Tariff Plan

    Glo Bounce tariff plan users are eligible to get free 15MB bonus data after recharging N200 and above within 7 days. so if you want to get free 15MB data bonus on your glo line, just migrate to Glo bounce tariff plan by dialling *170*4# and select 1 for confirmation.

    2. Activate Glo Generation G plan

    Glo generation G plan is somehow related to the above mentioned plan because you can also get 15MB data bonus valid for 2 days on recharge of N200 and above and an additional 50% bonus on recharge of N100, 100% bonus on recharge of N200 and 200% bonus of recharge of N500 and more. you can easily activate the plan by dialling *170*5# and select 1 for confirmation.

    5 easy ways to get glo free data bonus


    3. Buy Glo Modems

    Glo Attract data bonuses when you buy there modems because when you buy 7.2mbps Glo internet modem you get 260MB free data instantly and when you subscribe to to N1000 data plan you get 260MB free additional data for up to 12 months.

    Again if you buy 21.6mbps Glo internet modem you get and increment data of 520MB free instantly and when subscribe to a data plan of N1000 you get free 260MB data for up to 12 months.

    4. Migrate to Glo Gbam

    Glo Gbam users get free 5MB data valid for 1 day free of charge, to migrate dial *100*5*1#. data charges applied. This free data is applicable to users on small devices.

    5. Activate Glo 200% bonus Promo

    One of the amazing benefit to get when opt in for Glo 200% bonus is the giveaway of 15MB of data free on recharge of N200 and above within 7 days only and the data is valid for 5 days and also free 5MB of data on recharge of N100 once in 7 days, valid for 3 days.
    To opt in for Glo 200% bonus just dial *200#

    You can tell us another way to get free Glo data if you know via the comment box below

    Read Also:  Check out Glo cheapest tariff plan


    If you dont want to miss any of our latest update you can subscribe here with your email address or you can follow us on facebook to get the latest updates about tech and more.
     

    Sharing is Sexy


    Wednesday, June 8, 2016

    How to Cancel or Stops Auto-Renewal of Data Plan on MTN, Glo, Etisalat & Airtel

    Data renewal is a good thing on the other side and also bad thing on the other hand, as you know before taking any vital decision, the benefit to be realised has to put into consideration in favor of the decision-item in question. Auto-Renewal of data plan mostly annoys internet users because some subscribers are not actually ready to go for the designated data plan again. Etisalat is also among the networks that activate the automatic renewal of data plan as soon as the existing data has expired or exhausted.

    Activation of this automatic data plan annoys subscribers very much because some subscribers are not actually ready to re-subscribe again for the data and the network will deduct your money and gives you another data but nevertheless auto-renewal of data is important to those people who don't always disconnect there device online and always have airtime in their account. If you are the type that always get connected online and perfom some important job or transaction, then auto-renewal is important for you because your data will be renewed when its exhausted and which will also save you from unnecessary airtime deduction.

    On the other hand if you are a part time internet user and don't always get online, then this post is certainly for you because when you buy data from MTN, GLO, Airtel and/or Etisalat, auto-renew policy is automatically activated on the plan in the essence that whenever your data is exhausted and there is avaliable airtime on your line, the network will automatically deduct your credit and renew your current data subscription plan which is actually absurd to a part time internet user.

    how to stop airtel mtn glo etisalat auto renew data plan


    Now lets see how you can cancel or stops data renewal on MTN, GLO, Airtel and Etisalat network easily.

    How to cancel data Auto-Renew on MTN

    Simply sms NO to 131

    How to cancel data Auto-Renew on Glo

    Simply sms Cancel to 127

    How to Cancel data Auto-Renew on Etisalat

    Simply sms STOP to 229

    How to cancel data Auto-Renew on Airtel

    Simply sms  STOPAUTORENEW to 440

    Don't always forget to cancel your data auto-renew whenever you subscribe to a data service in every nigerian network

    Read Also: How to cancel all MTN, GLO, Etisalat and Airtel services to stop deducting your fund

    If you dont want to miss any of our latest update you can subscribe here with your email address or you can follow us on facebook to get the latest updates about tech and more.
     

    Sharing is Sexy 

    Get 300MB Data For free With Game+ Plan On MTN To Browse

    Internet is part of life as far as the technological development is concerned, because you can get any thing that is capable of making life sweet and great online via any kind device that can visit the internet.
     
    MTN free data plan is back again with package known as game plus: with MTN game plus you can be able to get up to 300mb on your MTN sim with validity period of 7days, Game plus data is working perfectly using Psiphon on any android device that have the ability to browse and also work on any PC using simple saver.
    Lets quickly Goto it as we recently make a post on the most Affordable Internet Data Plan and Call Tariff Plan of All Nigerian Networks This Month and i am so happy to introduce to you this 300mb frees MB on MTN, as known my aim is to make you in touch with any latest and hottest tip regarding FREE browsing so as to make you surf and enjoy the world of internet and lots more and also to help you with tutorials about PC and phone also to simplify any terrible situation to be favorable.

    Get 300MB Data For free With Game+ Plan On MTN TO Browse

    So if you are my type who always welcome free browsing and free data plan, get a chair and do this to enjoys free 300mb as i am enjoying mine to the time of this post.


    MTN Game plus data is back again and is working perfectly using Psiphon on android devices, with this MTN game plus you can be able to get up to 300mb on your MTN sim and the validity is 7days. For those that want to enjoy free browsing without pay any kobo kindly follow the steps below to set it up. - See more at: http://www.ufarblog.com/2016/06/enjoy-free-300mb-using-mtn-game-plus.html#sthash.JQcxWCOk.dpuf
    MTN Game plus data is back again and is working perfectly using Psiphon on android devices, with this MTN game plus you can be able to get up to 300mb on your MTN sim and the validity is 7days. For those that want to enjoy free browsing without pay any kobo kindly follow the steps below to set it up. - See more at: http://www.ufarblog.com/2016/06/enjoy-free-300mb-using-mtn-game-plus.html#sthash.JQcxWCOk.dpuf 
     kindly follow the steps below to set it up.
    How To Use Your Free 150mb On Your Android Device
    How To Use Your Free 150mb On Your Android Device

    How To Get Free Game+ data

    To get that is simple, just:
    • Text GM to 2200 for 150mb 
    • Text JW to 2200 for 150mb 
    • Do them both Making 300mb
    And you will receive a welcome message from MTN that ''You've successfully registered for MTN Game+......'' and you will be given free 150mb trial for 7days 
    HOW TO CHECK YOUR DATA
     Dial *559#
    How To Use Your Free 150mb On Your Android Device

    HOW TO RENEW THE DATA
    • Text CANCEL or STOP to 2200 Then re-send the above codes to get access another MB
    HOW TO USE ON PHONE
    Download Psiphon application HERE
    Install the app on your phone and configure it as follows;

    Get 300MB Data For free With Game+ Plan On MTN TO Browse

     Handler settings Note: Proxy server is game.mtnonline.com

    Get 300MB Data For free With Game+ Plan On MTN TO Browse
    Then configure your phone with the default MTN manual settings  and If you Don't know how to, check HERE

    FOR PC USERS
    just download the file below and enjoy.
    DOWNLOAD HERE
                                                   Prove for PC

    Get 300MB Data For free With Game+ Plan On MTN TO Browse

    Dont forget to configure your browser and if you dont know how to do that please click here
    How To Use Your Free 150mb On Your Android Device
    Open any of your Psiphon handler and configure it as show in the images below
    - See more at: http://www.ufarblog.com/2016/06/enjoy-free-300mb-using-mtn-game-plus.html#sthash.JQcxWCOk.dpuf
    How To Use Your Free 150mb On Your Android Device
    How To Use Your Free 150mb On Your Android Device
    How To Use Your Free 150mb On Your Android Device


    If you dont want to miss any of our latest update you can subscribe here with your email address or you can follow us on facebook to get the latest updates about tech and more.
     

    Sharing is Sexy 

    How To Use Your Free 150mb On Your Android Device
    Open any of your Psiphon handler and configure it as show in the images below
    - See more at: http://www.ufarblog.com/2016/06/enjoy-free-300mb-using-mtn-game-plus.html#sthash.JQcxWCOk.dpuf