Wednesday, March 23, 2016

Top 5 Features of VLC media Player you Probably Don't Know


Basically, Nowadays everybody uses VLC media Player but not everybody can explore through the basic tips and most important options hidden behind the media player. We all know VLC media player is the widely most used player for watching movie, listening to music and some other related stuff but the Player has so much in it that some PC users aren't aware.

Out of uncountable number of tips and tricks from media player, let us discuss only five basic features a beginner has to know in other to improve his/her capability to explore through that player easily.
5 Useful options in VLC media Player you don't know
You may just be watching movies or listening to music but you don't know some of this player features actually, well i guess after sighting those 5 basic options of VLC media Player, you will actually fall in love with it.

READ ALSO: How to enable Expert mode in windows PC


5 Basic Useful Options In VLC Media Player


Take a Snapshot while Playing Video


Most at times when you are watching a nice movie and you totally like some part of the scene as a photo or one of your best actor/actress is in play out of which you can't get the photo of the action in progress, then you can easily take a picture at the moment you feel necessary to do so.

How to Take screenshot in VLC media Player
Well taking a screenshot on VLC is pretty much simple with the following steps;

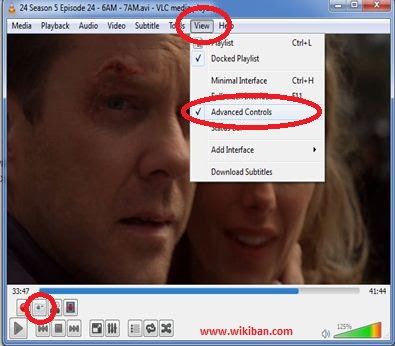
how to take a screenshot with VLC media player
  • Open the video which you want to take the screenshot as above
  • Go to View and select Advanced control
  • After ticking the Advanced control option, you will have a menu just above the media control keys
  • Now click the camera button to snap your picture inside the video
  • The picture will automatically saved to a desired folder of your choice
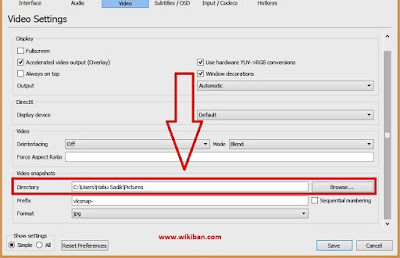
  • To select the path or directory where the picture wil be saved, Go to Tools>> Preferences and select Video tab to configure as below
 
Configure path or directory for saving VLC snap
  • After selecting your desired folder, just save and test your snapshot on VLC for better performance

Play Video Frame By Frame

This is another important feature by VLC media Player of which you are seeing it via the advanced control key but not considering it. Well do you know sometimes when you try to snap a picture out of a certain video you need to pause before grabbing the actual photo, in that case, when you pause, you won't be able to get the desired image in a video because you did not aimed the pause correctly to snap what you need, then i guess frame by frame will help you do the job easily here.
Sometimes you need to observe something in a movie but the scene is moving so fast that you can't be able to see then you can slow it down using frame by frame feature to observe anything within.
slow video down using frame by frame feature
How to use frame by frame feature on VLC
  • Just keep clicking the frame icon you see above and the video frames will be moving slowly to set what you need

Play Part of the Video Continuously

This is also another one of the VLC media player useful option when watching a movie or especially action movie whereby the actor/actress performs or do a certain thing of which you are interested in imitating then you can loop from where you are interested to where it ends.

READ ALSO: Format your memory card from any stubborn virus

the important of this is that you can repeatedly view a certain scene in a movie for a short while.

loop the video to a certain you point
How to Play Part of the Video Continuously
  • to set up the starting point click the button show on the image above to mark the beginning of the scene you need to show repeatedly 
  • If the scene you wants to view repeatedly has come to an end, then click the same button to mark the end of the loop
  • Then allow the video to be playing repeatedly until you are done, then click the same button to end the loop

Adjusting Video Screen Size (Crop)

Another exciting feature of this media player which many are aware but don't know the use of it is cropping while others take both cropping and zooming as the same feature which is actually wrong because sometimes in some cases there is videos that doesn't support zooming while cropping is necessary had it been video or image.

You can crop your video i.e. adjusting the video screen size to proportionate with your computer screen for you to watch your movies nice and comfortable.
how to adjust screen size of your video in vlc
How to Adjust the Screen Size of a Video in VLC 
  • Go to the Video tab above the VLC media Player
  • under the video tab select Crop and choose the expected size available on your computer screen
  • Alternatively you can use a shortcut key by pressing C on your keyboard to adjust the video Size

Record Another Video Inside a Video

you just learned how to crop an image above, then why not crop a video lol, you can cut out a joke inside a movie where the scene proves funny by recording so from the starting point to the end of the desired action in control.

Many take it as video cutter while others take it video recorder and as such this feature is so much important because of its significant role.
How to record video on vlc media player
How to record video inside another video
Well its pretty much simple just press the button as in the image above to start recording from the starting point and then again press it to stop your recording.
you can get your recorded video in the video folder in your computer library.

Increase the number of features that you know via the comment below


We always strive to give you quality contents and if you don't want to miss any of our latest updates, kindly click here to subscribe with your email address and don't forget to check your inbox for confirmation

    Tuesday, March 15, 2016

    Ultimate Guide to Format Your Memory Card From Any Viruses

    Bring yourself closer here along with your stubborn memory card that is making you headache due to formatting errors and viruses that is trying to kill your SD card. Even i myself sometimes i fear this nowadays viruses in peoples memory card, ranging from the one you know up to the one you can't be able to even detect. 

    I'd like to introduce to you SD card Formatter 4.0 for SD/SDHC/SDXC provided by SD Association to format your memory card without having any further problem you may think of. For those that are aware of the software, am sure they can give a good testimony of it's work and how it format some troubling memory card by bringing live from death in memory card.

    READ ALSO: How to repair damage or corrupt SD-card

    The software is available for both windows and Mac which you can use to format your memory card easily with card reader. As you know some memory card are not actually good which doesn't store data for a long time without corrupting it and sometimes it even renders your smartphone into another problem you may no think of.

    How to format memory card using SD formatter V4


    firstly, download SD formatter here for both windows and/or Mac 

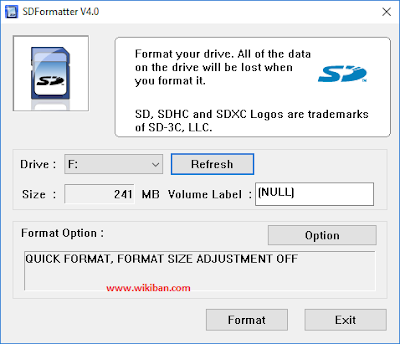
    and install it on your PC, then run the program as you can see the interface below

    how to format memory card using sd formatter
    Insert your memory card into the card reader before running the program, After that the program will automatically detect your memory card or if contrary click the refresh button there. Now go to options as you can see above to set your preferences for erasing your SD card.

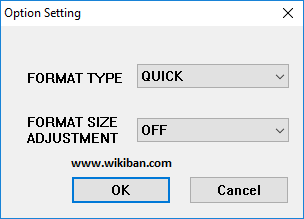
    set options for SD formatter V4
    A small dialogue box will appear with two options, firstly the format type options which consist of Quick, Full (overwrite) and Full(erase). In that case i recommend you select Full(overwrite) as format type and ON as format size adjustment for proper execution of the job.

    Finally Click OK to save it and click format to begin the formatting process but another windows dialogue box will still appear to asking you for a confirmation because the process is irreversible and will delete all your memory card data, but you have to be patience because it might take a little while for the formatting process to finished.
    formatting process of your memory card
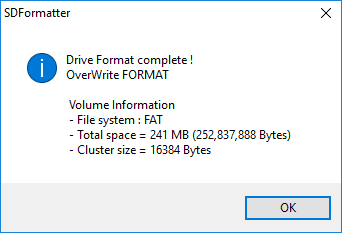
    Well as you can see and as you are warn above to not remove the memory card until the formatting process completed. After the formatting process is done a similar dialogue box will appear as shown below.

    formatting process completed
    Now you have successfully format your memory card using SD formatter V4 which will wipe out all your data and make your SD card a clean new one to make a start again with it.

    If you encountered any problem in the process of doing so feel free to ask via the comment below.

    We always strive to give you quality contents and if you don't want to miss any of our latest updates, kindly click here to subscribe with your email address and don't forget to check your inbox for confirmation.

    Monday, March 14, 2016

    How to Enable Expert Mode on Windows PC

    Everyone knows the control panel has a lot of features and options but seems a lot more difficult for those that can't be able to explore through and configure what they need. With the Enabling of Expert Mode you can be able to view all your control panel settings in one folder grouped by application which will be simpler and easier for starters to modify their system settings.

    Users of windows 8.1 and windows 10 tend to find it difficult to look for a specific settings in their control panel after checking and re-checking but still can't be able to find what's required which as a result sometimes make someone to downgrade back to windows 7.
    How to enable expert mode on windows 7, 8, 8.1 and 10
    I believe from now on after reading this guide you won't be able to even look back for your control panel, because all you need is stored in a one single folder on your desktop for easy access.

    READ ALSO: How to fix .ink shortcut error on windows pc without software
     
    As the name implies Expert Mode or sometimes being referred to as Master control panel which is a single folder on your desktop that contains your control panel settings split.

    How to Enable Expert Mode on your windows PC


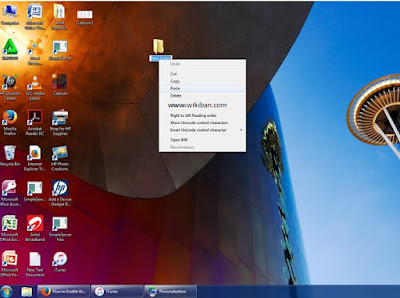
    First and foremost, to enable Expert Mode on your windows PC either windows 7, 8, 8.1 or 10 create a new folder on your desktop and rename it to this>>>

    Expert Mode.{ED7BA470-8E54-465E-825C-99712043E01C}
     
     
    copy the above code and paste it as the name of your new folder

    rename new folder to enable expert mode
    immediately after renaming it to the above given code the folder will change its icon to that of control panel as you can see above, which after then, you can open to view all your necessary settings easily
    Settigns inside expert mode folder
    with the above view you can see that the folder contains so many setting segregated into different categories, you can also search anything your need by using the search bar at the top right hand side of the Expert Mode folder.

    Don't worry about compatibility, because its comptabile with windows 7, 8, 8.1 and 10 respectively.

    Feel free to ask anything you don't understand.


    We always strive to give you quality contents and if you don't want to miss any of our latest updates, kindly click here to subscribe with your email address and dont forget to check your inbox for confirmation
     

    Saturday, March 12, 2016

    Check out the First Truly Nigerian E-mail Address

    Despite the fact that Google is now the best in terms of both search engine and e-mailing services doesn't stop our dear naij.com to introduce the first and best Nigerian E-mail service. I know some are aware of the recent development but many don't know about the emergence of this newly Nigerian E-mail service. 

    The naij.com interface was perfect and good and much more simpler that other e-mail services which is also a perfect way for starters to start sharing their ideas through one of the nigerian best news portal site. I know most of us use Google mail, yahoo mail, hotmail and other mail services but it is also good to patronize our home made e-mail services.
    nigerian no 1 truly e-mail service
    As you can see i have already start using the naij.com mail services both for personal and my blog address. The mail can be access on your mobile devices, smartphone, and/or Tablet PC for convenient anywhere. You can also get free 2GB mailbox size for starting point subject to unlimited increment for active use of the service.


    Getting started to use mail.naij.com E-mail service


    To get started just open your browse and go to Mail.naij.com
    and create new account with them..

    you can also contact us via wikiban@naij.com for support and other inquiries relating to your mailbox problems. so far how can you rate this development..


    We always strive to give you quality contents and if you don't want to miss any of our latest updates, kindly click here to subscribe with your email address and dont forget to check your inbox for confirmation
     

    Friday, March 11, 2016

    Download and Activate the Avast 2016 latest Anti-Virus for Free

    There is no doubt that Avast is playing the crucial role of one of the best Anti-Virus programs in circulation because of the authentic security that the anti-virus provides to its users. Mostly 90% of PC's and Desktop's are currently running the best anti-virus programs which necessitate me to share this new and latest 2016 version of the software. The latest version of the Avast has been updated with the great thread detecting system capable of detecting any kind of malware, virus, worms, adware and threads.
    Download the latest Avast 2016 ani-virus for protection from potential malwares and spywares
    Many key features were added and improved among which  includes, passwords, safezone browser and so much more. The user interface has been improve for more user engagement and content fitness, so also the Avast Home Network Security now scans more vulnerabilities on your router, public and home networks respectively.

    READ ALSO: Download SmadAv 2016 Anti-Virus for better security

    Not withstanding the new version can clean your PC of Junk files and improve performance and it also performs a quick scan of your registry for obsolete programs without rebooting....

    How to Download the Avast 2016 Anti-Virus Software


    Just download it here http://files.avast.com/iavs9x/avast_free_antivirus_setup.exe

    and install it on your PC

    After successful installation then you can proceed to Activate the Avast with the following license key

    How to Activate the  Avast 2016 with license key


    Activation using license key is an offline activation where you will insert the license key provided by Avast to enable you enjoy the service for 1 year.

    The license key is:

    C00382224H1200A0218-S5P5CM81

    Copy the Key Above and Follow these instruction to insert


    1. Highlight the license key above, then right-click it and select "Copy".
    2. Open your avast! Free Antivirus controls and select the "Settings" tab.
    3. Next, click the "Registration" tab.
    4. Click the arrow next to "Offline registration" to expand this option.
    5. Click the "Insert the license key" button.
    6. Right-click in the empty Registration box and select "Paste".
    7. Click "OK" – your license key is now inserted and your avast! antivirus software can now be used free of charge for a further 12 months.

    Comment below if you face any issue on the following 


    We always strive to give you quality contents and if you don't want to miss any of our latest updates, kindly click here to subscribe with your email address and don't forget to check your inbox for confirmation

    Why you should Use Google Drive than other Cloud Storage to Store your files Online

    Google drive is an online cloud storage service powered by google that let users stores and synchronize digital content either in form of music, pictures, video, documents and/or application across computers, laptops and mobile devices including Android Powered tablet and smartphone devices. Well without disturbing you with big grammar i think in this 21st century using google drive as a means to store your files is much more valuable and guaranteed than the local hard drive, because anything that is stored online is secured for long time without having the fear of loss/theft or any unauthorized access by anybody.
    Important of google drive to starters
    the way technology is coming this closer and closer more especially those who are always online like bloggers, webmasters, researchers and so on,  i think the most easiest and convenient way to save important documents is using cloud drive which is why i recommend Google drive, Because most of all people that are online now have Gmail Account.

    READ ALSO: Usefull Google Tips and Tricks to help Improve your Search Result

    i know many of you are aware of Google Drive and are using it while some are aware of it but aren't taken such into consideration because of the exorbitant cost of data internet plans in nigeria as for the time being.

    Actually not everything deserve to be uploaded online, you can't just upload any trash online because of the data usage but there are some important documents like PDF file, word documents ranging from assignment, project and any other important material which you might not want to lose it.

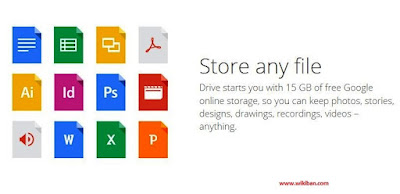
    Each and every Gmail Account that is existing and those that will be created have a free space of 15GB automatically to that account consisting of  google drive, photos and mail. you can even upload a folder to your google drive or create a folder within to re-organize your documents.

    how to upload file on google drive

    How to Use Google Drive

    Well google drive can be accessed in a desktop/Pcs or in a mobile device or smartphone to store your data.

    to Accessed it from your computer using a browser click drive.google.com 

    or alternatively you can download the desktop app to your computer so that you can always synchronize your files whenever your online. download the desktop app here http://google.com/drive/download

    After accessing the above link in your browser just login with your Gmail  credentials i.e (username & password) to access the world of cloud storage and upload or download your new files or existing files respectively.

    READ ALSO: Cloud or Hard Drives; Deciding The Best For Your Business

    if you don't have a gmail, create one and get a fresh 15GB drive to store your docs or if your like my type that always store big files your can expand our storage by paying to their monthly plan.
    google drive plan to expand your storage
    Well is not everyone that can afford PC but many wants to upload some phone application or similar documents that is of most important to them which brings about the use of the mobile google drive app, you can easily download the google drive app on your phone and keep uploading your documents through your phone so that you can retrieve them whenever and where ever you are.

    For Android devices download here 

    For Iphone/ipad download here 

    and enjoy the most secured online cloud storage ever. 

    Google drive is simple to operate as compared to other online cloud storage like dropbox, icloud and others

    Some of the benefits of using Google Drive

    • Renaming of uploaded files and folders easily
    • Create, move, or delete files and folders
    • search for your files when they are bulky 
    • sort your files suit your need
    • mark important or favourite files as starred
    • share your files to others so that they can view, download or comment.
    At least i know with these point you can easily enjoy using Google drive services


    We always strive to give you quality contents and if you don't want to miss any of our latest updates, kindly click here to subscribe with your email address and don't forget to check your inbox for confirmation