Wednesday, September 7, 2016

How to Easily Download & Install Android 7.0 Nougat AOSP ROM for Sony Xperia Z1

The Unofficial AOSP 7.0 Nougat ROM is now available For Sony Xperia Z1. Here We will be sharing step by step guide to Download & Install Android 7.0 Nougat AOSP ROM On Xperia Z1. Follow the given steps to Update Sony Xperia Z1 to Android 7.0 Nougat Via AOSP.

Xperia Z1 becomes the latest Xperia device to get the unofficial AOSP Nougat 7.0 ROM. There are unofficial Nougat ROMs available for Some Xperia devices, Google Nexus 5, Nexus 4 and Oneplus One. This is a great news for all Xperia Z1 (honami) users who want to experience the latest Android on their devices. Follow the given steps carefully to Download & Install Android 7.0 Nougat AOSP ROM On Xperia Z1.

Special thanks to  XDA Senior Member SuperLamicr for releasing the initial build of Android 7.0 AOSP ROM for Sony Xperia Z1. This method only works on Sony Xperia Z1 variant with TWRP installed on it. So make sure that, your Xperia has TWRP then follow the given guide to Download & Install Android 7.0 Nougat AOSP ROM On Xperia Z1. This will Update Sony Xperia Z1 to Android 7.0 Nougat.
download and install android 7 nougat on sony xperia z1


DISCLAMER:

www.wikiban.com will not be held responsible for any kind of damage occurred to your device while following this tutorial. Do it at your own risk.


REQUIREMENTS

  • Make sure there is at least 60% battery left on your smartphone before begin.
  • Make sure you have a custom recovery (TWRP/CWM) Install On your device. We recommend TWRP Recovery.
  • Now from TWRP Recovery Take a proper Nandroid backup so that you can restore anytime you need.

DOWNLOADS

download the right ROM according to your device’s name and model number

HOW TO FLASH/INSTALL ANDROID 7.0 NOUGAT AOSP ROM ON Xperia Z1

  • First, download the Android 7.0 Nougat AOSP ROM and Gapps For Sony Xperia Z1 From the download section above
  • Now connect your Xperia device to the PC and transfer the ROM and Gapps to the internal memory of your device (remember the location)
  • Now boot your device into recovery mode.
  • Now follow this guide to Flash Android 7.0 Nougat AOSP ROM On Xperia Z1  How To Install A Custom ROM Via Recovery On Any Android
  • After Flashing the ROM, now Flash the Gapps. Guide  How To Flash Gapps Using TWRP Recovery
  • Done!!! Now reboot your device from TWRP recovery (TWRP Recovery main menu >> Reboot System)
  •  Your Xperia Z1  should be updated to Android 7.0 Nougat.

via XDA


If you don't want to miss any of our latest update you can subscribe here with your email address or you can follow us on facebook to get the latest updates about tech and more.

Don't forget to share!!!

How to Flash/Install a Custom ROM via Android Recovery on any Phone (TWRP & CWM)

In this step by step guide you will learn How To Safely Flash/Install A Custom ROM Via TWRP Recovery Or ClockWork Mode Recovery (CWM) On Any Android device. You can use this guide to install any other third party ROM (e.g: Carbon  ROM, Chroma ROM and other AOSP ROM). So just follow the steps given below to Flash/Install A Custom ROM Via Recovery On Any Android devices

Note:- This guide is not for a single device. You can follow this guide to install/Flash any  Custom AOSP ROMs On any android device having TWRP/CWM custom recovery on it. Make sure that you have the right ROM for your device.

This is a very simple and easy process. Make sure your device’s bootloader is unlocked and your device has CWM/TWRP recovery. Then just flash the Custom ROM Zip file via TWRP/CWM recovery. Don’t worry we will be sharing all the steps so follow them carefully.

If you don’t have TWRP On your android then install it Or Follow this guide–>>How to Install TWRP Recovery via Fastboot On Any Android Device

For Samsung devices–>>How to Install TWRP Recovery On Samsung Devices Using Odin

Important: Remember after installing the custom ROM you have to separately install the Gapps pack. Guide>> How to Download & Install Gapps Pack

how to install custom rom via android recovery
 

How To Install A Custom ROM Via Recovery On Any Android

Guide to Install A Custom ROM Using TWRP recovery:

Before Flashing any ROM, we highly recommend taking a Android backup via TWRP recovery.
  • Download and transfer the ROM and Gapps file to your device’s internal storage / External storage.
  • Boot your device into TWRP recovery. i.e. Android Recovery
  • Select “Wipe” from TWRP main menu and do a “Swipe to Factory Reset” on the bottom of screen.
  • Go back to TWRP main menu, tap on “Install” and select the ROM .zip file that you transferred to your device in Step 1. 
  • After selecting the .zip file, do “Swipe to Confirm Flash” on the bottom of screen to begin the custom ROM installation process. This may take some time.
  • Once your ROM is successfully flashed, you’ll see “Wipe cache/dalvik” option, select it and then do “Swipe to wipe” on bottom of screen.
  • Now flash the Gapps file similarly like you flashed the ROM file.
  • After flashing both ROM and Gapps, Reboot your device.

Using Clock Work Mode Recovery (CWM):

  • Download the custom ROM and put it in the Internal/external memory of your device (remember the path)
  • Boot your device into CWM recovery.
  • Take a NANDROID backup of your ROM (Important)
  • From Recovery screen, select “Backup and Restore
  • Now select “Backup” to start the nandroid backup process.
  • After the backup is done, navigate back to main recovery screen.
  • Now select “wipe data/factory reset” option. When it asks for confirmation, select “Yes” to confirm data wipe process.
  • Then return back to main recovery menu. Now you will install the ROM zip file that you placed to SD card/Internal memory of your device in step 1.
  • Select option “install zip from sdcard” then choose the ROM Zip file. When it asks for confirmation, select “Yes” to start installation
  • Once the installation is completed, reboot your device.
  • Done!!!
  • Then Install the Gapps using the same steps.

If you don't want to miss any of our latest update you can subscribe here with your email address or you can follow us on facebook to get the latest updates about tech and more.

Don't forget to share!!!

How to Install TWRP Recovery via Fastboot on any Android Device

If you are new to these terms then let me explain what Fastboot/bootloader means. Bootloader/Fastboot mode allows you to flash any partition on an Android device like system, boot, recovery, cache.. etc. Using Fastboot/bootloader, you can also flash the custom built .img files via fastboot. For example, a custom recovery like TWRP or CWM.

If you want to flash TWRP recovery via fastboot then just follow the easy and simple step by step guide on how to Install TWRP Recovery via Fastboot On Any Android Device. This is applicable for most of the android devices. But there are some devices like Samsung devices which may not work with this guide. You have to use Odin Flash tool to Install TWRP recovery.


Recommended: how to unlock the bootloader of any android device


Note: For Samsung Devices, we recommend using Odin Flash tool to Install TWRP recovery

Important

  • Make sure your device has more than 50% battery

How to Install TWRP Recovery via Fastboot On Any Android Device

how to open cmd using adb and fasboot


  • Connect your device to the PC. And type the following into the command window we opened in step above to boot your device into bootloader/fastboot mode:
adb reboot bootloader

If your asks for permission to “Allow USB debugging”, tap OK.
  • Once your device boots into bootloader mode, issue the following command into command window to flash the TWRP recovery .img file:
fastboot flash recovery twrp-2.8.x.x-xxx.img
  • Here modify twrp.img with the name of your TWRP recovery .img file, OR change your TWRP recovery filename to twrp.img and use the command above.
  • Once TWRP is successfully flashed on your device, issue the following command to reboot: 
  fastboot reboot
  • Done!!! Now you have TWRP on your device
If you don't want to miss any of our latest update you can subscribe here with your email address or you can follow us on facebook to get the latest updates about tech and more.

Don't forget to share!!!

Easy Guide to Unlock the Bootloader of any Android Phone & Enable USB Debugging with OEM Unlocking

In this guide, you will learn How easily you can Unlock Bootloader Of Any Android Using Fastboot Commands. It is a very simple and easy method. You don’t need to have technical knowledge. Anyone can Unlock Bootloader Of Any Android just by issuing few fastboot commands. So just follow the guide to get your device’s bootloader unlocked.

If you want to root your device or want to install a custom recovery, ROMs,Kernel & MODs then you have to unlock the bootloader of the android device first. After Unlocking the bootloader, you can Flash modified system, boot, kernel, custom recovery (TWRP/CWM) or other .img files on your device.

Unlocking Bootloader is now a very simple process. You can do this by just issuing some fastboot commands. The process is same for most of the devices but there are Companies like Sony, Motorola, Huawei and other OEMs officially allow users to unlock the bootloader on their devices. You have to first get a unlock password from the manufacturer Website, then you can easily unlock the bootloader by issuing few ADB & Fastboot command.
how to unlock the bootloader recovery of any android device


Here we will be using a windows computer, so make sure you have one.

Note: Unlocking bootloader will completely wipe your device’s data (Everything like music, photos, videos & apps). So we highly recommend taking backup of your important data. So take a backup of your apps and data.

DISCLAIMER:
www.wikiban.com will not be held responsible for any kind of damage occurred to your Android Device while following this tutorial. Do it at your own risk.
 

REQUIREMENTS

  • Make sure there is at least 60% battery left on your smartphone before begin started this process
  • Install USB Drivers on your computer. (USB Drivers)
  • Enable USB debugging by going to: settings>>developer options>>usb debugging and if you can't find developer options on the setting go to "about" and press the "build number" options 5 times (tap it five times to enable the developer options.
  • Enable OEM unlocking under setting>>developer options
  • Setup ADB and Fastboot on your PC. (For Windows) It will create a ADB & fastboot folder

How To Unlock Bootloader Of Any Android Using Fastboot Commands

First read the Requirement section carefully.
  • Connect your android to your PC with USB cable
  • Now go to ADB & fastboot folder and Open the command window there (Right click on the empty space inside the folder then select “Open command window here” option to launch a cmd window)
  • Now reboot into the bootloader by  issuing the following commands. (Make sure your device is detected by your PC)
adb reboot bootloader
  • Now Check fastboot connectivity by giving the command below. If your device is connected properly then it should return device code.
fastboot devices
  • Once in the bootloader, issue the following fastboot command to unlock the bootloader. (This will unlock your phone and wipe all data of your device)
 fastboot oem unlock

  • Done!!! Reboot the phone and boot into your unlocked device. Use command:
fastboot reboot
  • To check the bootloader status, issue the command given below. It should return “True” on unlock status.
fastboot unlock-info
  • If you use Mac or Linux machine, use the code: “./fastboot oem unlock” for iOS and “sudo fastboot oem unlock” on Linux. 

Recommended: How to Install TWRP recovery on any Android Device

If you don't want to miss any of our latest update you can subscribe here with your email address or you can follow us on facebook to get the latest updates about tech and more.

Don't forget to share!!!
2 Easy Ways to Download Facebook Videos with Both PC and SmartPhone

With the introduction of Facebook videos, still many users don't know how they can download the Facebook videos that is being uploaded by a friend but they have no choice than just to watch it and live it online. in a case where you want to download your Facebook video and save it for offline watch, then this tutorial is for you to do so easily.

A lot of people must have been wondering how they can easily download Facebook videos on their Smartphones or PC, but don’t know how to do that, now lets go straight to the point.

Two Different Method to Download Facebook Videos


Method 1

  •  Open the video you want to download from your Facebook
  • Paste the link inside the field as seen below

how to download facebook video
  • You’ll see an option to download … chose and your download will begin.

Method 2

  • Download Facebook video downloader to your Android device here
  • Login to your Facebook account
how to download facebook video
  • Scroll to any video you’ll like to watch offline, open it and the download option will automatically pop out.
  • Click on the download button and your download will begin.
Thats it enjoy, if you have other method to download facebook videos, share it with us

Recommended: How to enjoy free facebook with Airtel

If you don't want to miss any of our latest update you can subscribe here with your email address or you can follow us on facebook to get the latest updates about tech and more.

Don't forget to share!!!

Monday, September 5, 2016

How to Manually Update Nexus 5 to Android 7.0 Nougat (AOSP ROM)

Google has officially released Android 7.0 Nougat stable version for nexus users. All the latest nexus devices and Android one devices have received the update. We have already posted on how to Download Android Nougat 7.0 for Nexus 5X, Nexus 6, Nexus 6P and Nexus 9 (OTA Files). But Google Nexus 5 is  not in the list. Nexus 5 is now 3 years old device and Android Marshmallow 6.0.1 was its final official update.

Nexus devices are very popular among the devs, so there are many custom ROMs available to update the old nexus to latest Android. Now there is a great news for all Nexus 5 users. There is an AOSP ROM available for Nexus 5 which will update the device to latest Android 7.0 Nougat.

Very Special thanks to Santhosh M over Xda for sharing the Android 7.0 Nougat ROM for Nexus 5. But remember, the ROM is in its beta stage, so there are many bugs present. The ROM can’t be used as daily driver.
How to manually update your nexus 5 to android nougat 7


But if you have a Nexus 5 and want to try out the latest Android 7.0 Nougat, then you should try flashing this AOSP ROM. But before flashing, make sure you have a proper android backup. So that you can restore your previous backup.

IMPORTANT NOTE

DISCLAMER

www.wikiban.com will not be held responsible for any kind of damage occurred to your device while using the following tutorial. Do it at your own risk.

REQUIREMENTS:

  • Make sure you have a custom recovery (TWRP/CWM) Install On your device.We recommend TWRP Recovery.
  • Now from TWRP Recovery →Take a proper Android backup so that you can restore anytime you need.

DOWNLOADS

Download the right ROM according to your device’s name and model number

How to Flash/Install Android 7.0 Nougat On Google Nexus 5


If you dont want to miss any of our latest update you can subscribe here with your email address or you can follow us on facebook to get the latest updates about tech and more.
 

Don't forget Share.

Saturday, September 3, 2016

How to Block & Unblock a Number on Google Duo

Here at www.wikiban.com i will be sharing a detailed step by step guide on How to Block or Unblock a Number On Google Duo. If you are using Google’s new video call app then you should know the steps to Block or Unblock a Contact On Google Duo.This guide will help you to do so.

Google’s new video calling app is no more in beta. Google Duo is now available in Google play store. Anyone having an android device can download the application. This is just like Skype, We have personally used the app and it worked pretty well.

The google’s Duo app works like Whatsapp, Users can only call the person if the number of that person is saved on user’s Contacts. But like WhatsApp, anyone having your number on his contact list can video call you which sometimes disturbing.


But there is a  great news for Duo users, Users now can easily Block or Unblock a Number On Google Duo app from the settings menu. Here we will be sharing all the steps to Block/Unblock a Number On Google Duo.
how to block or unblock a number on google duo


How to Block or Unblock a Number on Google Duo

How to Block a Number on Google Duo

  • First Go to Google Duo app and open it
  • Now click on the three-dot menu on top-right corner of the app, and select Settings from there.
  • Next, select Blocked numbers from Duo settings.(All the blocked numbers will appear there)
  • Then touch the + icon in the top-right corner of the screen to add a number from your contacts to the blocked numbers list.(You only blocked the saved number)
  • Done!!!!

How to Unblock a Number on Google Duo

  • Follow the first 3 steps from How to blocked guide above
  • In the Blocked numbers, you will see all the numbers you have blocked
  • Now Touch and hold on the number you want to unlock, a pop-up will show, select UNBLOCK from the pop-up.
  • Done!!!!

If you don't want to miss any of our latest update you can subscribe here with your email address or you can follow us on facebook to get the latest updates about tech and more.

Don't forget to share!!!

If you have any question related to this post, feel free to leave that in the comment section

Thursday, September 1, 2016

How to Root Gionee Elife S Plus and Unlock its Bootloader for Android 6 Marshmallow

Gionee recently released an update for the Gionee Elife S Plus taking it from Android 5.x (Lollipop) to Android 6.0 (Marshmallow). Recall that Team Hovatek had released the rooting technique for the Gionee Elife S Plus running on Android 5 Lollipop. For those who’ve upgraded to Marshmallow, there’s yet another difficulty rooting. This guide will teach you how to root your Gionee Elife S Plus after upgrading to Android 6.0 Marshmallow.

Take into consideration that before rooting your Gionee S Plus you need to unlock its bootloader to give you access to execute a command and in the process of unlocking Gionee S Plus bootloader you need to be familiar with the process of setting ADB and Fastboot on your PC before unlocking its bootloader and consequently, to arrive at the rooting of your device. Don't worry all the steps required are explained below in details, but before you begin make sure you download all the files below as its the prerequisites of rooting your Gionee Elife S Plus.

Requirements

Now the first step is to unlock Gionee S Plus bootloader but apparently we need to install ADB and Fastboot on our PC Check here for how to install ADB & Fastboot
After installing the ADB drivers on your PC lets look at how you can unlock Gionee S Plus Bootloader 

How to Unlock the Bootloader of Gionee S Plus

  • First and foremost back up your personal stuff because this process will wipe your phone data
  • Enable USB debugging by going to: settings>developer options>usb debugging and if you can't find developer options on the setting go to "about" and press the "build number options 5 times (tap it five times to enable the developer options.
  • Enable OEM unlocking under setting>developer options
  • connect the phone with a usb while the phone is on
  • launch ADB
  • in the ADB run the following command and (press enter after)
adb devices
  • now adb will detect your phone i.e. Gionee S Plus
  • after adb detect your device, boot it into fastboot by running the following commands
adb reboot-bootloader
  • the phone will now reboot and enter fastboot (black screen with only fastboot written at the top or bottom
  • in fastboot run the following command on your device (press enter after)
fastboot oem unlock
  • You should get a prompt on the device asking you to confirm Bootloader unlock, press the volume up button for Yes
  • You should now get a success message
  • reboot the device by running the command below
fastboot reboot
Note: if you are getting the message  “unlock operation is not allowed” when trying to unlock your bootloader then go back and make sure that you enable OEM Unlocking under developer options on your device.
Now after you have successfully unlock the bootloader of Gionee S Plus lets proceed on the final process on how to root your device easily.

How to Root Gionee S Plus

  • After downloading the above superSU, copy it to both SD card and Internal Storage
  • Extract and copy the TWRP recovery image you earlier downloaded above and paste it into the same folder as fastboot.exe and adb.exe (the location is above)
  • Connect the phone to the PC again using usb while the phone is on and boot it into fastboot with this command adb reboot-bootloader and press enter
  • Now the phone will restart and boot itself into fastboot
  • when the phone enter fastboot, flash the recovery.img to the phone by typing this command fastboot boot recovery.img and press enter
  • the phone should now boot into TWRP recovery
  • In TWRP, if you get a prompt asking you to swipe to allow modification of the System partition, tap KEEP READ ONLY
  • In TWRP, you use the Volume up button to scroll up, Volume down button to scroll down and Power button to select
  • If TWRP offers to root the phone, select NO
  • In the TWRP Recovery, tap Install
  • Scroll down to Install zip and select it
  • Navigate to the location of SuperSu.zip and select it
  • Swipe to confirm flashing of SuperSU.zip and wait till flashing is complete
  • Reboo the device
  • Confirm Root by installing and running Root Checker
how to easily root gionee elife s plus

    Recommended: Root tecno C9

    If you dont want to miss any of our latest update you can subscribe here with your email address or you can follow us on facebook to get the latest updates about tech and more.
     

    Don't forget Share.

    How to Install Android ADB & Fastboot with Drivers on Windows

    If you want to root or want to do any other modding to your android device through fast boot then you must have ADB and Fastboot installed on your Windows, otherwise, the device will not connect to your PC and you can’t perform the task.Both the tools are used to send terminal commands to an Android device from a PC command line.

    Before Proceeding You should learn what is ADB and FastBoot:

    ADB :Android Debug Bridge

    This works when the device is powered on and booted into OS or Recovery. The tool helps in sending basic Linux commands, and a variety Android-specific commands from PC to connected Android devices.

    Fastboot:

    Fastboot mode allows you to flash any partition on an Android device like system, boot, recovery, cache.. etc. Using Fastboot / bootloader, you can also flash the custom built .img files via fastboot. For example, a custom recovery like TWRP or CWM.
    how to install adb and fastboot


    Installing and Setting Up ADB and Fastboot can be very lengthy on a Windows machine. But thanks to XDA member Snoop05 who has developed a small program to quickly install both ADB and Fastboot files on your PC (system-wide) along with proper drivers. Just Follow the simple and easy step by step guide to Install Android ADB and Fastboot on your Windows device.

    How to install ADB and Fastboot

    • Download 15 seconds ADB Installer 1.4.2
    • if the above one doesn't work try this ADB Installer v1.3
    • After downloading the ADB & Fastboot from the above link
    • Run the Installer as an Administrator
    • For "Do you want to install ADB and Fastboot?" tap the Y key then press Enter
    • For "Install ADB system-wide?" tap the Y key then press Enter
    • wait till its complete
    • For "Do you want to install device drivers?" tap the Y key then press Enter
    • In the installer Wizard that pops up, click Next
    • Click Finish when done
    • Go to My Computer / Local Disk ( C: ) , you should see a folder named ADB
    • to run adb or fastboot open the adb folder
    • hold down the SHIFTkey on the keyboard
    • while holding down the SHIFT key right click on an empty space in the adb folder
    • Select open command window here

    how to install adb and fastboot

    • now you are good to go
    • you can use the command to unlock other devices bootloader and do many more as you wish


    If you dont want to miss any of our latest update you can subscribe here with your email address or you can follow us on facebook to get the latest updates about tech and more.
     

    Don't forget Share.

    How to Easily Root Infinix Hot S X521

    Infinix Hot S X521 is one of the latest Infinix devices running Android 6.0 (Marshmallow) making it not really supporting Apks for rooting. As you all know that rooting your android phone could really void the warranty of your device and as such, the consideration of doing so lies on you alone and all other incidents and/or accidents make it fully your responsibility. All Credit goes to team hovatek for porting up the TWRP for Infinix Hot X521.

    With everything on ready let move on the process on how to root your Infinix Hot S X521 easily without having much stress.

    How to Root Infinix Hot S X521

    1. Install VCOMM Drivers on your PC Here
    2. Download SuperSu 2.66 .zip Here
    3. Copy the SuperSU.zip file to both your memory card and phone internal storage
    4. Download TWRP Here
    5. Switch off the device
    6. Flash the TWRP Recovery.img to the phone using sp flashtool, if you don't know how to check here 
    7. Boot the Device into Recovery mode using Vol up + Power Button
    8. In TWRP, if you get a prompt asking you to swipe to allow modification of  system partition,TAP Keep Read only 
    9. If TWRP offers to root the phone, select NO
    10. In the TWRP Recovery, tap Install
    11. Browse to the location of the superSU and select it
    12. Swipe to confirm flashing of SuperSU.zip and wait till flashing is complete
    13. reboot the device
    14. confirm the status of the root by installing and running root checker
    easy method to root infinix hot s
     
    Any problem encountered, Drop it via the comment box below

    Read Also: How to root tecno C8


    If you dont want to miss any of our latest update you can subscribe here with your email address or you can follow us on facebook to get the latest updates about tech and more.
     

    Don't forget Share.

    How to Reset Windows 10 PC without loosing Important Files

    Its quite normal for your Windows 10 PC to slow down after several app installs. Lagging could also be as a result of driver, registry or malware issues. Although we’d dropped a very helpful guide on how to fix a slow PC, resetting is sometimes the easiest fix but the fear of losing important files deters many. This guide will teach you how to reset your Windows 10 PC and most importantly, not lose your valuable files.

    Will I lose my files and installed applications after I reset?


    Installed applications? Yes. Files? depending on your selection. As a rule of thumb, backup all your important files to an external storage device (SSD, HDD, SD card or Flash drive). This guide is however aimed at preventing file loss as a result of the Operating System (OS) reset.

    How do I reset my Windows 10 PC and still not lose my files?


    * Note: Ensure that the PC’s battery is well charged or charging throughout the process (recommended) to avoid an interruption due to a drained battery.

    There are two methods you could use:

        Reset from outside Windows
        Reset from within Windows (recommended)

    How to Reset Windows 10 Without loosing important files

    • Launch the Windows Start menu and click Settings
    • Click Update & Security
    • Click Recovery and Select Reset This PC
    • If you wish to retain your files but remove apps and settings, select Keep my files (Recommended). If you wish to remove apps, settings and files, select Remove Everything.
     
    how to reset windows 10 pc without loosing files
     
    • You should get a notification of what is about to be removed
    • Click Reset to commence the reset
    • Sit back and take a cup of coffee and wait for the resetting process to be completed and you will find yourself in windows 10 setup menu
     
    If you don't want to miss any of our latest update you can subscribe here with your email address or you can follow us on facebook to get the latest updates about tech and more.

    Don't forget to share!!!

      Monday, August 29, 2016

      How to Download, Install & Play PES 2017 on your Android Smartphone

      PES 2016 is actually outdated as par my say because when something new and latest has been unleashed then certainly we are bound to get rid of the old ones because time determines everything. Am happy to announce the release of PES 2017 i.e. pro evolution soccer the best and the only nice football game available to android users and you can now easily download, install and play the game on your device without worrying about the real sony playstation.

      PES 2017 aka winning Eleven 2017 was announced 25 May 2016, and was declared to be discharged 13 and 15 September 2016 on PC, Xbox 360, Xbox One, PlayStation 3 and PlayStation 4. 

      Now i can give you the link to download and the guide to install it on your phone and play it comfortable in the confine of your room.


      Some of Feature of PES 2017

      • Enhanced Passing
      • Genuine touch ball control
      • Enhance objective tending method and more
      how to download install and play pes 2017 for android

      How to Download PES 2017

      Download PES 2017 Here : Password: PESFUXION2016-17
      Download PPSSPP Gold Here


      How to Install and Play your PES2017 Game on your Android

      • Download the PES2017 with the above link
      • Download ppsspp gold using the above link and install it on your phone
      • After download the PES2017 you will find out its .RAR file and you need to extract it using a PC or phone if possible but you need to use the above password before extraction
      • After extracting the PES2017 you will see the game in .ISO file format named "PES2017.ISO" then move the file in to your SD card>>PSP>>GAME
      • Open PPSSPP Gold you earlier install and find games then tap PES2017 and play
      • Enjoy
      • Note: If after playing the game it shows you a black screen only, then go to ppsspp setting and change the system language to espanyol
      how to download and play pes2017 for android smartphones
      If you don't want to miss any of our latest update you can subscribe here with your email address or you can follow us on facebook to get the latest updates about tech and more.

      Don't forget to share!!!

      Saturday, August 20, 2016

      How to Use DC Unlocker 2 Client to Unlock your Modem

      Having just DC Unlocker to unlock your locked modem is not the only issue but how to use it to unlock some modems that are proven stubborn are also success. Different kind of modems are actually in play now and the operators are putting strong measures to encrypt there modem not to support different kind of sims.

      Let me be precise with you, there are some modems like E3531 online dashboard that you can't be able to unlock it for free until you buy credit from dc unlocker and before buying the credit make sure you know how many units will unlock your modem and i recommend you visiting dc unlocker home page to view the details of the credit needed and amount required.

      In this post, I quickly want to show you how to use dc unlocker software to unlock modems and also to know the firmware version of Huawei e303 and any modem. You can use dc unlocker client to unlock mtn modem, glo modem, etisalat modem as well as airtel modems.

      How to Check the Firmware Version of your Modem with DC Unlocker 2 Client

      Before you proceed make sure you download the new DC Unlocker 2 Client
      1. Ensure you’ve installed the modem on your PC.
      2. If modem is connected to the internet, disconnect it.
      3. Close the modem interface by clicking on “File > Exit”.
      4. Leave the modem plugged to the PC
      5. Double-click the on dc-unlocker2client in the dc unlocker folder
      6. Select manufacturer of your modem from the drop-down list
      7. Set model to “Auto-detect
      8. Click the magnifying glass icon.
      9. Wait till it shows details of the plugged modem.
      10. You will see the firmware version of your internet modem in the displayed details as seen below :
      how to unlock any  modem stubborn

      How to Unlock your Internet Modem or Dongle with your DC Unlocker 2 Client

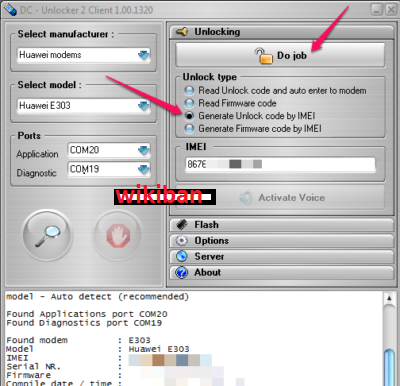
      You can use dc unlocker to generate unlock code for your internet modem if it auto-detects the imei number of your internet modem.

      Follow the instructions above.
      Once dc unlocker displays details of your modem, click on “unlocking

      Note: make sure you login with your  username & password that you bought credit from dc unlocker to enable you pass through this process.

      how to unlock any modem with dc unlocker

      Select “generate unlock code by imei"
      Click “Do job

      Wait for a moment till the program displays this message: unlock is successfully done.

      Now you can use any SIM card on your unlocked USB modem. 

      Let us know if you have any problem

      If you don't want to miss any of our latest update you can subscribe here with your email address or you can follow us on facebook to get the latest updates about tech and more.

      Don't forget to share!!!

      Download DC Unlocker 2 Client to Unlock Huawei, ZTE & Other Stubborn Modems

      With how internet market is growing rapidly, it is imperative to have a modem and not just a Modem that will support single Sim but a universal modem that can accept different service provider sims because the data plan competition is rocking hit and fast as you can't use a single operator sim to browse for up to two months without testing other networks offer. You are using MTN to browse but when Etisalat sometimes release cheap data plan then you have to port to Etisalat in other to enjoy the offer, thats one of the benefit or advantage of owning a universal/cracked modem.

      If your ZTE Modem or Huawei Modem is proving stubborn to cracked or you are having a hard time to unlock it and all efforts proved abortive, then this new DC Unlocker 2 Client will easily wipe out your tears in a bit.

      You can download DC unlocker 2 client software version for free and use it to detect your internet modem before buying credits to unlock it if it is not one of those that you can use the software to unlock for free. Unlocking your data card is easy if you use DC unlocker full version.

      It makes it very easy to unlock huawei, zte modems which don’t display space one can enter an unlock code generated from a dongle unlocker. If you are a Nigerian, you can use DC Unlocker to unlock 3G internet modems of MTN, Glo, Etisalat and Airtel.

      Features of DC Unlocker Software

      1. DC-unlocker is a program specialized for data card unlocking.
      2. It is the first universal data card unlocking product worldwide.
      3. It is fast ( takes 5 – 60 seconds to unlock), easy to use and functional program with clear interface.
      4. It doesn’t need any cables or adapters for unlocking. The data card can be simply unlocked in the same notebook where a PCMCIA or Express socket exists.
      5.  New models are being added regularly.
      6.  No need to select any COM ports, auto detect function.
      7.  Free updates for 1 year.

      download dc unlocker client 2

        How to Download DC Unlocker 2 Client

        Click Here to download dc unlocker 2 client 
        it a zip file, after downloading it extract it to a folder on your pc
        open the software and enjoy unlocking your data cards


        If you don't want to miss any of our latest update you can subscribe here with your email address or you can follow us on facebook to get the latest updates about tech and more.

        Don't forget to share!!!